NOTE: Building this new PC and using it as a server was all done with encouragement and help of my friend James. He has held my hand through this entire build and configuration and flat out figured out the final part of this configuration for me and never gets enough credit. You can find him on Github here and his own dev blog here. Thanks James!
Introduction
I recently built a new desktop with the goal of using it as a Proxmox server and gaming machine. After plenty of struggling, I managed to get GPU passthrough working with the Radeon RX 7800XT graphics card. Because I relied so heavily on posts from people in the community to get it working, I wanted to document my working configuration in the hopes that it might help someone else out there!
Machine Specifications
- CPU: AMD Ryzean 9 7950X3D
- GPU: PowerColor Hellhound Radeon RX 7800XT
- Motherboard: MSI MAG X670E TOMAHAWK
- Memory: G.Skill Trident Z5 RGB 96 GB (2 x 48 GB) DDR5-6400 CL32
Working Configuration
I started with the PCI Passthrough guide on the Proxmox Wiki. First I followed the steps in the Verify IOMMU parameters section. The defaults for my setup already had IOMMU enabled, remapping was enabled, and IOMMU isolation was working by default (the GPU was in its own IOMMU group). I was a bit confused when I didn’t get the exact same output as is described in the documentation, but this was only for verifying IOMMU was enabled. The output I received was:
root@pve:~# dmesg | grep -e DMAR -e IOMMU
[    0.553626] pci 0000:00:00.2: AMD-Vi: IOMMU performance counters supported
[    0.652066] perf/amd_iommu: Detected AMD IOMMU #0 (2 banks, 4 counters/bank).
There was nothing here strictly saying “enabled” but this output does mean it is working in case you get something similar.
Next I followed the GPU Passthrough section. Somewhat confusingly, this section starts with a link to a blog post by Andries Faassen that describes a lot more of the steps you have to take to actually get this working. The post was written in 2018 and I’m not sure if it is being updated. Following it did not get passthrough working for me, and I found several blog posts that built on this one for newer machines and video cards. Here are the changes I made for each of the section headings in Faassen’s blog post:
-
Testing Repository: Nothing changed here. Seems to work with current kernels.
-
Change Boot Parameters:
- Edited
/etc/default/grubto change theGRUB_CMDLINE_LINUX_DEFAULTtoGRUB_CMDLINE_LINUX_DEFAULT="quiet iommu=pt" - run
update-gruband reboot
- Edited
-
Blacklist drivers from loading
- Blacklist drivers using the following commands
echo "blacklist nouveau" >> /etc/modprobe.d/blacklist.conf echo "blacklist nvidia" >> /etc/modprobe.d/blacklist.conf echo "blacklist radeon" >> /etc/modprobe.d/blacklist.conf echo "blacklist amdgpu" >> /etc/modprobe.d/blacklist.conf - Add the following to make sure drivers load during kernel initialisation
echo vfio >> /etc/modules echo vfio_iommu_type1 >> /etc/modules echo vfio_pci >> /etc/modules echo vfio_virqfd >> /etc/modules- Use
lspci -vto find your GPU and it’s address as described in the blog post - Edit
/etc/modprobe.v/vfio.confto add the vendor ID to load a different driver for it. I only added the GPU - not the audio device as described in the blog post, explained below - and omitted a few of the options in the blog post. I added the following line:options vfio-pci ids=1002:747e disable_vga=1
- Blacklist drivers using the following commands
-
Creating the VM
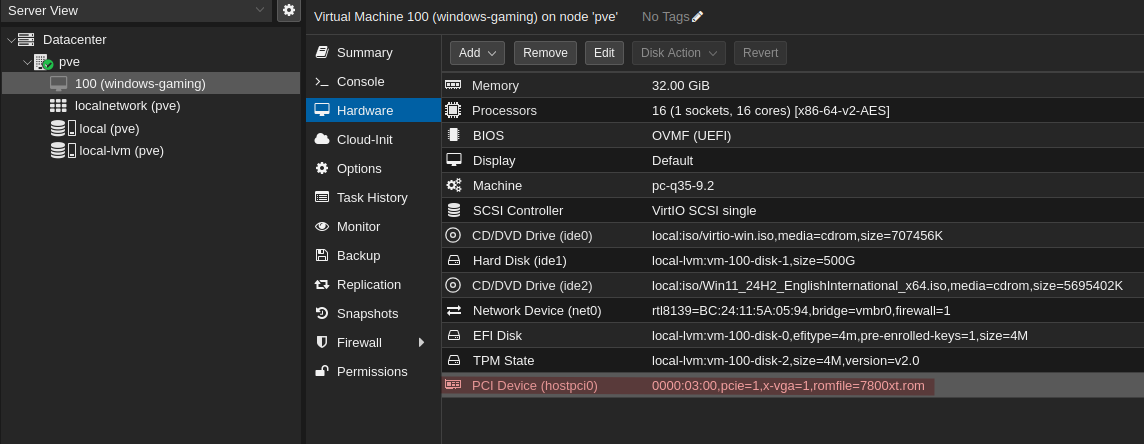
- The steps here are mostly correct, except that Proxmox now has an option to load the VirtIO driver ISO as an option during creation of a Windows VM. Here is what the hardware config for my machine looks like:
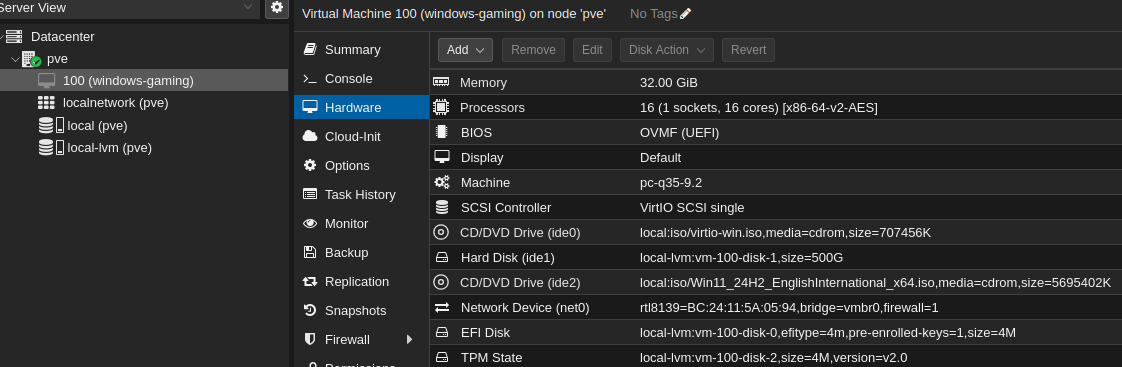
- The steps here are mostly correct, except that Proxmox now has an option to load the VirtIO driver ISO as an option during creation of a Windows VM. Here is what the hardware config for my machine looks like:
- I did NOT add
q35to the/etc/pve/qemu-server/<MACHINE NUMBER>.confin this section!
At this point I stopped following the Faassen’s blog post. I booted the machine and installed Windows. Once you configure the GPU passthrough you won’t be able to connect to the machine via the Proxmox GUI, only RDP. I got around this by installing Parsec and connecting via Parsec (note that you need to install Parsec at the system level, not per user in order to connect via Parsec once Windows boots).
Once that was done, I configured the GPU passthrough in Proxmox. Faassen’s blog post describes how to do this via the command line, but I did it with the Proxmox GUI. Steps:
-
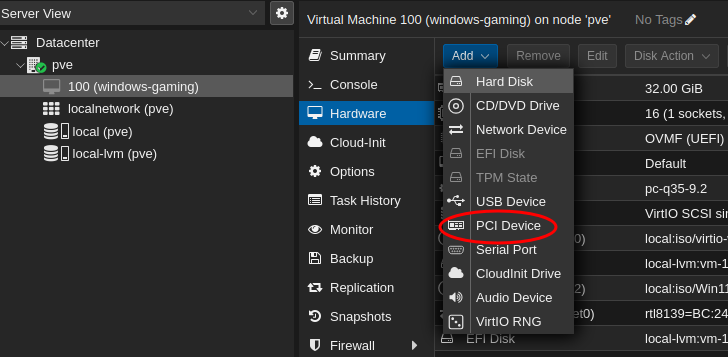
First go to the machine and click on “Add” and click on “PCI Device”:
-
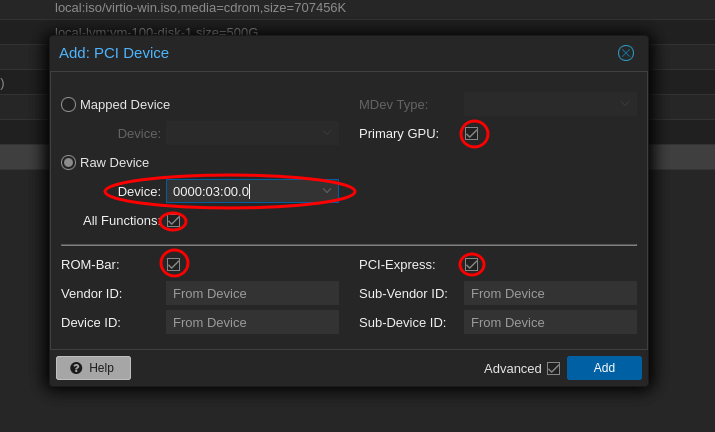
Select “Raw Device” and add the device that corresponds to your graphics card (in my case it was “0000:03:00.0”). Also select all the available options (you have to click on “Advanced” in the bottom right to get the ROM-Bar and PCI-Express options).
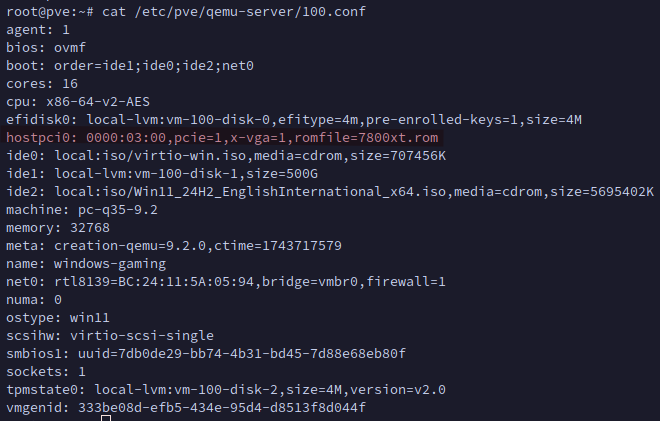
At this point passthrough was kind of working. Windows detected the GPU and started installing drivers. When I restarted the VM however, it would never properly boot and would cause Proxmox to restart all the machines. After more research I tried the suggestions from the following (much more recent) blog post on the Proxmox forum related to the 7000 series of GPUs (remember, I have the 7800). Starting about half way through the first post find the heading Download GPU ROM. You can use the search tool on TechPowerUp.com to find it by vendor and model number. I used wget to download it to /usr/share/kvm and renamed the file to 7800xt.rom. Then add the romfile via the shell as described in the article. For example, mine was edited in /etc/pve/nodes/NODE/qemu-server/100.conf (because my Windows vm is numbered 100), and you can see the line in the file here:
You should now see when selecting your Windows VM in the Proxmox GUI that the romfile is showing for the PCI device:
At this point the VM loaded properly. However, rebooting the VM will freeze Proxmox. This is known as the “reset bug” and has been an issue for years. Some places will tell you it has been fixed, but only for some models of cards. More research shows that it is still a problem for the 7000 series. That forum post is great, and that user has posted several times helping to fix and share configs for GPU passthrough over the years.
We tried a few possible fixes for the reset bug, and the one that ultimately worked is found here. It’s 5 years old, but I can vouch that it works for my machine. The install instructions are laid out here in the readme.
Audio
At the point GPU passthrough was working without issue. Audio was not! Earlier I had mentioned that I did not add the audio device as described in an earlier blog post. On a tip from a friend (James, see above), I installed this and it worked immediately.
Next Steps
One of the blog posts above describes how to get this working without downloading the ROM from TechPowerUp.com by just creating a ROM of all zeros. If that solution works, it might not require the RadeonResetBugFixService.
Update
28-04-2025: I tested the machine by using the zeroed out ROM mentioned just above and it still required the RadeonResetBugFixService. I also tried disable the ROM bar and though it did still boot properly, it also required the RadeonResetBugFixService.
05-05-2025: I’ve now also created a Linux VM for gaming because Easy Anti-Cheat detects that Windows is running in a VM and refuses to launch some games (Sea of Thieves for me). I used Bazzite because it seems to be well regarded by Linux gamers and I’m so far impressed! Adding the Linux machine was the same as adding the Windows VM, including adding the same ROM to the .conf file for the machine. Bazzite detected the graphics card on next boot. It seemed like the reset bug was still a problem though, as once I shut down the Bazzite VM it would not start again without giving me an error and requiring a reboot of the host machine to allow the GPU to reset properly. I played around with various possible fixes but none of them worked. Then I deleted the Bazzite VM and recreated it and…poof…it worked. The reset bug doesn’t seem to be affecting it at all, it is rebooting without issue. I have no idea what I did different the second time. Some notes:
- I’ve set Bazzite to autologin when it starts
- Once you’ve configured the GPU you won’t be able to use the Proxmox console to connect anymore. To get around this I:
- Configured Bazzite to autologin when it starts
- Configured Sunshine to autostart on launch
- Connect to Bazzite via Moonlight